Tuesday, October 8, 2013

Birthday Bake: Teddiron topped Raspberry and White choc cupcakes!

A little friend was turning 11 years old so wanted to bake something special for her birthday! I've known her since she was 4... and seen her grow up so much :) 
Everybody loves cupcakes! They are a nice sweet gift that look pretty ^^" So I tried to make some "pretty" looking cupcakes (although my icing/decorating skills still average....). But you can turn average looking cupcakes into cute cupcakes by simply adding a macaron (or teddiron to be exact) on top!! =D amazing what one macaron can do~~ hehe
Raspberry and White Chocolate Cupcakes with raspberry buttercream frosting
Modified Vanilla cupcake recipe 

Ingredients
125g butter, softened
3/4 cup caster sugar
2 tsp vanilla essence
2 eggs
1 1/2 cups self-raising flour
1/2 cup milk
1/2 cup white chocolate chips
1/2 cup frozen/fresh raspberries

Raspberry buttercream frosting
2 tbs butter, softened
1/2 cup icing sugar
1/4 cup frozen raspberries, crushed

1. Preheat oven to 190oC and line a 12 hole muffin pan with cupcake cases.
2. Cream butter, sugar and vanilla with electric mixer until pale.
3. Beat in eggs one and a time, beating well after each addition.
4. Sift over flour and mix until almost combined. Stir in milk.
5. Fold in white chocolate chips and raspberries. Spoon into muffin holes and bake for 15 minutes or until skewer inserted into the centre comes out clean.Once cooked, removed from oven and allow to cool. 
Fresh from the oven~
6. Meanwhile make frosting by placing all ingredients in small bowl. Beat using electric mixer until it all comes together to form frosting consistency. (At first, it may seem very crumbly but be patient and keep beating! It'll come together~). If you find it's too runny, add more icing sugar... if you find it too dry add more butter or raspberries :)
7. Ice cooled cupcakes and top with white chocolate chips (optional).
I made the teddirons using Adriano Zumbo's salted caramel macaron mix. I placed a toothpick inside to help it stand on top of the cupcake. (They kind of look like macaron pops ^^) I also wrote on the other side of the macarons with white chocolate spelling out Freesia's name ^^
Teddiron pops!
 So happy birthday Freesia! Hope you have a wonderful day!!! :)
 

Sunday, September 29, 2013

Introducing the Tiramisu cake!!!!


It was a friends birthday 2 months ago (this is a very belated post XD) and she had requested a few months prior that she would like tiramisu for her birthday. I didn't want to just make it in a glass dish so decided to get a little creative.

I used the same recipe as my previous tiramisu (alcohol free) but instead cut the Savoirdi biscuits in half and used some left over chocolate ganache as "glue" to place them on the border of the cake tin. I used the rest of the biscuits to form the layers of the tiramisu and managed to get 2 layers of biscuit and cream~ Topped with MILO and coffee and some Oreo Cheesecake balls.

So happy the cake actually held together =D

Looking forward to next year's request... =p

Thursday, September 26, 2013

Work catering #31: Baker's block

I had a bit of a "baker's block" (Like writer's block.. xP) this week.. as well as a little bit of a lack of motivation... hehe! It's not that I didn't have ideas, it was more like.. the ideas didn't excite me as much! It's hard to explain~ hehe

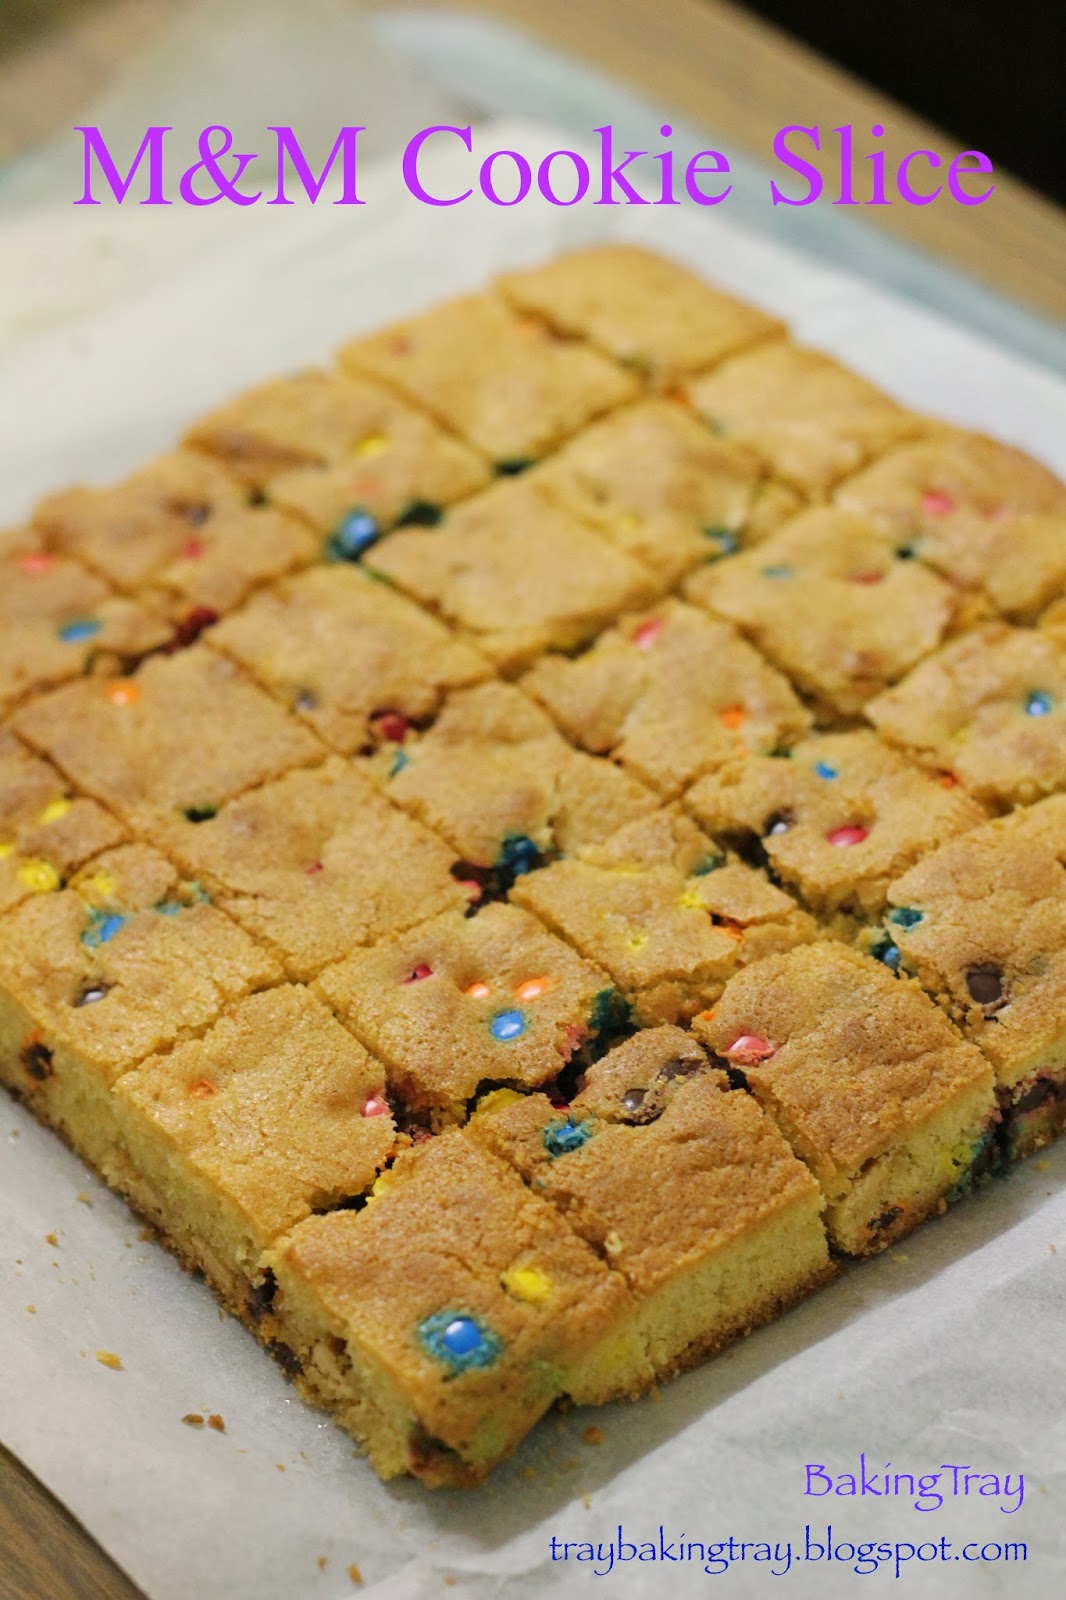
Anyways made slices this week! The first had the original name of "Golden M&Ms bars" but I've renamed it "M&M cookie slice" because it really tasted like M&M cookies.. just in a slice form!

M&M Cookie Slice
Recipe adaped from tasteofhome
Ingredients
113g (1/2 cup) butter, softened
3/4 cup caster sugar (I would recommend reducing to 1/2 cup)
3/4 cup brown sugar (again, reduce to 1/2 cup)
2 eggs
2 tsp vanilla extract
1 1/2 cups plain flour
1 tsp baking powder
1/2 tsp salt
1/2 cup white chocolate chips
1 1/2 cups mini M&Ms

1. Preheat oven to 180oC and grease and line 20cm square baking tin.
Cream butter and sugars until light and fluffy. Beat in eggs one at time and then vanilla until smooth batter.
2. Add flour, baking powder and salt to the batter. Stir in chocolate chips and 1 cup of M&Ms.
3. Spoon batter into baking tin and spread evenly. Sprinkle with remaining 1/2 cup M&Ms.
4. Bake for 20-25 minutes or until golden brown. Cool on a wire rack and cut into squares to serve. 
bursts of M&M colour ^__^
The second slice is a Chocolate cheesecake slice. Can't go wrong with cheesecake =p This slice is really addictive!! Once you start, it's hard to stop >__< well for cheesecake lovers like me. The marbled melted chocolate gives a lovely crunch factor to the creamy slice.

Chocolate Cheesecake Slice
Recipe adapted from Baker's corner

Ingredients
250g plain chocolate biscuits (I used chocolate ripple biscuits)
90g butter, melted
3 tsp gelatine
2 tbs hot water
250g cream cheese, softened at room temp
395g (1 can) Condensed milk
1/3 cup lemon juice
1/2 cup cream, whipped 
125g dark chocolate, melted

1. Process biscuits until fine crumbs. Add melted butter and press firmly into lined 20x30cm baking tin. Refrigerate for 30 minutes or until firm. 
2. Dissolve gelatine in hot water in small bowl and allow to cool slightly.
3. Beat cream cheese until smooth. Add condensed milk and beat until smooth.
4. Fold in lemon juice and gelatine. Finally fold in cream and spoon mix onto prepared base.
5. Pour over melted dark chocolate and use a knife to create a marbled affect. Refrigerate until firm and cut into squares to serve.
Delicious squares of chocolate cheesecake!
Bite size so you can have MORE bites XD
Hope my motivation comes back next week!!! =D

Tuesday, September 24, 2013

R U OK? DAY cake competition

For those who didn't know, it was R U OK? DAY 2 weeks ago in Australia. This day is to encourage people to ask others "R U OK?" in the hope of having a meaningful conversation =) and support those going through trouble. A very good cause. You can find out more info on their website.


We had a cake competition at work for this day. The theme was: Black and Yellow - the colours of the R U OK? DAY logo. The judging was based on looks alone so you had to be quite creative with it. I must admit, I am not a cake decorator.. (I do want to learn though!) so I made a simple chocolate banana cake (it's actually the recipe for chocolate banana bread but I baked it in a round cake tin =p) and iced the top with cream cheese icing with a little yellow food dye added to it. I wrote the logo with my handy icing pen and decorated the border with some oreo cheesecake balls.

The results were anounced this week and............. I .... didn't win =( hahha! but I wasn't really expecting anything. The winners' cakes were AMAZING!!! there was this minion cake and cake pops.. just really creative entries! But I'm just glad I could share this cake with colleagues and got them talking about R U OK? day ^^"

Monday, September 23, 2013

Work catering #30: Salted caramel & Nutella stuffed double chocolate chip cookies!!!!


That's a mouthful!!! hahah literally XD As soon as I was shown this recipe, I HAD TO MAKE THESE COOKIES!!! Just the thought of salted caramel oozing out of a chocolate cookie fresh from the oven .... :O :D haha!!

anyways all credits go to Top with Cinnamon! Great food blog :) She made GIANT cookies!! But i made smaller ones... probably couldn't fit as much nutella

Salted Caramel and Nutella stuffed Double Chocolate chip cookies
Recipe adapted from TopWithCinnamon
Ingredients

Cookies
110g butter
1 1/2 cups brown sugar
1/2 cup cocoa powder
2 eggs
1/4 tsp salt
3/4 tsp baking powder
2 cups plain flour
100g dark chocolate chips
1/2 cup nutella

Salted caramel
66g caster sugar
3 tbs water
8g butter
3 tbs thickened cream
1/2 tsp vanilla extract
1/4 tsp salt

1. To make the salted caramel, put sugar and water into medium saucepan. Stir together over medium-high heat just until the sugar dissolves. Tilt and swirl the pan while the mixture boils (do not mix with spoon!). Keep swirling until it has reached a yellowish-golden colour. Immediately take off heat!
2. Add butter (be careful as may splatter) and swirl it in.
3. Stir in cream, then vanilla and salt. Place in small bowl and set aside for later.
4. To make the cookies, preheat oven to 180oC and line 2 baking trays with baking paper.
5. Melt butter in medium saucepan. Take off heat and stir in brown sugar and eggs.
6. Add cocoa, salt and baking powder. Stir until combined.
7. Add in flour and stir until combined. Stir in chocolate chips.
8. Take a heaped teaspoon (or tablespoon =p depending on how big of a cookie you want) of dough and roll into a ball. Place on baking paper and press lightly with palm of your hand. Use your finger to make an little well in the centre of dough.
9. Fill hole with small blob of nutella and top with salted caramel. Top with a little bit more dough and seal the edges. 
10. Bake for 8-10 minutes. 
yummy chocolatey cookies!
oozing salted caramel~
Just to balance out the super sweetness, made some no bake Lemon Slice :)
Lemon Slice
Recipe adapted from Diminishing Lucy
Ingredients
1/2 cup condensed milk 
100g butter
200g Marie biscuits
1 cup desiccated coconut
zest of 2 lemons

Lemon icing
1 cup icing sugar
20g butter, softened
Juice of 1 lemon

1. Grease and line 8 inch square cake tin with baking paper.
2. Place condensed milk and butter in small saucepan over medium heat. Stir for about 5 minutes or until butter has melted.
3. Process/crush biscuits until fine crumbs. Add to mixing bowl with coconut and lemon zest. Add hot butter mixture and stir until well combined.
4. Press mixture into prepared pan using back of metal spoon.Refrigerate for 1 1/2 hours or until firm.
5. To make icing, place icing sugar, butter and lemon juice in bowl. Beat with wooden spoon until smooth. Spread over slice. (note: for a thicker layer of icing, double recipe).
6. Refrigerate for a further 30 minutes. Cut into squares and serve

lemon slice squares~
topped with zesty lemon icing :)
Oh and in exciting news I was invited to join Everyrecipe ^___^ a compilation of Australian cooking sites and blogs :) It's pretty cool so I can get more readers to my blog =D so check it out for more baking inspiration!!!

Friday, September 13, 2013

Work catering #29: Cream cheese theme~


I love everything cream cheese! I mean, who doesn't? You can make frozen cheesecake.. cream cheese frosting... baked cheesecake.. slices.. cakes.. so much variety!!! =D =D OR you can just eat it by itself =p haha ok.. maybe that's going a little too far!

After recipe searching, I found this delicious recipe for Green Tea cream cheese brownies! YUM! everything I love~~ Green tea.... cream cheese... brownies!! =D

Green tea cream cheese brownies
Recipe adapted from dailydelicious
Ingredients
Green tea cream cheese batter
170g cream cheese
35g caster sugar
1 tbs plain flour
1 egg
30ml thickened cream
2 tsp green tea powder

Brownie batter
70g plain flour
1/4 tsp baking powder
1/4 tsp salt
130g unsalted butter
200g dark chocolate
175g caster sugar
3 eggs

1. Preheat oven to 180oC and line 23cm square pan with baking paper.
2. To make green tea cream cheese batter, beat cream cheese and sugar together until smooth.
3. Add cream and egg and beat until smooth. Sift green tea powder and stir until combined. Add flour and stir to combine. Set aside.
4. For brownie batter, place butter and chocolate into saucepan over medium heat and stir until melted.
5. Add sugar and salt and sugar until combined. Remove from heat and allow to cool for 5-10 minutes. (if the batter is too hot, it will scramble the eggs!)
6. Beat eggs together and add to bowl, stir to combine.
7. Sift over the flour and baking powder and stir until smooth. Pour batter into prepared pan. Spoon the green tea cream cheese batter on top and swirl with a knife to create marbled effect.
8. Bake for 40-45 minutes. Don't overcook it (as I almost did!) as it can become dry.
Brownie squares =D
See the marbled top? ^^
I also made my oreo cheesecake balls! (sticking to the cream cheese theme =p). You can find the recipe here.

Hmmm..... looking for more inspiration for next bakes! Feel free to give me suggestions!! =D

Monday, September 9, 2013

Work catering #28: Inspiration from desserteries - Zumbo Patisserie and B&P sweet studio

I've been eating wayyyy to many sweets recently >____<" but all in the name of research ;P haha! Adriano Zumbo has opened up a pop up shop recently selling his "Chouxmacas - choux pastry topped with a macaron" and I've somehow become a regular customer =p" 
Pina coloda chouxmaca! so cute ^^
taking a look inside the Banana cheesecake chouxmaca! my favourite one~~~
Masterchef has also made Burch & Purchese sweet studio quite popular too! So went to visit (again) and the desserts were AMAZING!!! =D =D =D!!! Oh and I met a former Masterchef contestant -> KYLIE :) she was lovely ^^
Delicious desserts!! love all the layers and textures and flavours! <3
Kylie! super nice :) Has the dream job at B&P!
So those desserts have given my inspiration for this week's work catering =) I made lychee and coconut pannacotta - inspired by B&P's multi-layered desserts; and chocolate macarons - inspired by Zumbo's macarons!!
Lychee and Coconut Pannacotta
Ingredients
1 1/2 cups thickened cream
1 1/2 cups coconut milk
3/4 cup caster sugar
3 tsp gelatin
1 can lychees 
1 packet (85g) create-a-jelly (Aeroplane brand)
1/2 cup shredded coconut

1. Place cream, milk and sugar in saucepan over medium heat. Stir till sugar dissolved.
2. Add 3 tbs boiling water to gelatin in small bowl and mix to form a gel. Add gelatin mix into cream mixture and stir till gelatin dissolved.
3. Remove from heat and allow to cool slightly.
4. Pour into jug and pour into plastic shot glasses (~3/4 full). Drain canned lychees (reserving 200ml lychee juice) and cut each in half. Place lychee half into each glass and refrigerate for around 1 hour or until set.
5. Empty jelly powder into separate jug, and add 1 cup (250ml) boiling water. Stir and dissolve well. 
6. Add 200ml of lychee juice and stir well. Remove pannacotta from fridge (once set) and pour lychee jelly into each shot glass. Return back to fridge and allow to set.
7. Place shredded coconut on lined baking tray. Bake for around 10 minutes at 200oC or until toasted. Sprinkle coconut onto pannacotta and serve.
I wanted to create different textures (creamy pannacotta plus crunchy toasted coconut) and also add an element of surprise (the lychee in the middle). I'm really happy with this one! The flavours complimented each other really well, no ingredient overpowering the other (HAHA! sounding like a Masterchef judge). I was really happy because many people gave great comments ^___^" Like "this is the best thing you have ever made" - whoa... and "who bought these?" =D The only complaint was "you should make the glasses bigger" hahaha
Since I was making a an order of macarons, decided to make extra for work! Haven't made them in a while and glad they turned out well! No strange/creative flavours like Zumbo does, just simple chocolate :) You can find the recipe for my Chocolate Macarons here. Still my most visited recipe ^_^"
Oh and EXCITING NEWS! ADRIANO ZUMBRO TRIED THESE MACARONS!!!! Yes!!!! He came to his pop up shop for the last day and so i brought some of these for him to try XD XD while most people were asking for a photo and autogtraph, I stood there holding my box of macarons and asked if he would try one! XD XD! He said "a bit too crunchy, they should be softer..." i think because they weren't freshly made and dried out a little! but happy to get some feedback from the Macaon Master himself!! hehe... oh and I did get a photo too ;P
with the macaron master Adriano Zumbo!

Macarons finally making an appearance for work catering =p
close up of macarons! see the "feet" hehe