Sunday, November 27, 2011

What's red and velvety?

I just made it in time for my entry for "Aspiring Bakers #13!!!* hosted by Min of Min's blogThe theme for November is "Enjoy cupcakes" so I decided to bake RED VELVET CUPCAKES!! This is the first time I have made them and they didn't turn out as "red" as I would have liked them.... but hopefully they are still "velvety" ^_^"

I also finally made cream cheese frosting (i remember I had a craving for it a while ago..) but as I don't own a piping bag the frosting looks a bit weird =S I got this recipe from The Cake Mistress' blog who adapted the recipe from the Hummingbird Bakery Cookbook.


Ingredients

60g unsalted butter, room temperature
150g caster sugar
1 egg, lightly beaten
10g cocoa powder
20 ml red food colouring (I used 20ml water with red colouring powder added)
1/2 tsp vanilla essence
120ml buttermilk (I replaced this with normal milk)
150g plain flour
1/2 tsp salt
1/2 tsp bicarb soda\
1 1/2 tsp white wine vinegar (I used normal white vinegar)

Cream Cheese Frosting

300g icing sugar
50g unsalted butter, room temperature
125g cream cheese, slightly softened

1. Preheat oven to 170oC. Line 12-hold cupcake tin with patty cases.
2. Beat butter and sugar with electric mixer until light and fluffy. Gradually add egg and beat until well combined.
3. In a small bowl, mix food colouring, cocoa powder and vanilla extract until thick paste consistency.
4. Add paste to the butter mixture and beat thoroughly until colour is mixed evenly through the batter. The mix should be a deep rose pink/red.
5. Slowly add half the buttermilk until well mixed then add half the flour until well mixed. Repeat for the remaining milk and flour, beating until the mixture is smooth.
6. Add salt, bicarb soda and vinegar and beat for a couple more minutes.
7. Spoon into each cupcake hole about 2/3 full.
8. Bake for 20-25 minutes or until skewer inserted comes out clean.
9. Remove cupcakes from tin and allow to cool completely on wire rack. Meanwhile prepare cream cheese frosting.
10. In a food processor or electric mixer, beat the icing sugar and butter until well mixed.
11. Dice the cream cheese into smaller cubes and add to the mix, beating until completely combined. Continue beating until frosting becomes light and fluffy (~5 minutes)
12. When cupcakes are cooled, pipe the cream cheese frosting on top.

cupcakes for u :)
Happy with this photo =) for my future cookbook XD hahaha

Tuesday, November 22, 2011

say... CHEESE-cake!

It was recently my younger sister's birthday and we were having a little *surprise* gathering for her so I decided to make the birthday cake!! It was also good timing because I had just bought cream cheese!!! which means... CHEESECAKE!! My sister just thought I was making it for fun... but little did she know it was for her birthday!

Happy 21st~~
The last time I attempted to make a cheesecake was YEARS ago back when I was in.. high school? we went over to a friends house to bake it~ back then i wasn't really into baking that much and the cheesecake turned out... alright.. a bit too dense and not so sweet. So this is the FIRST cheesecake I have made since BakingTray began =p

This is a frozen cheesecake (NO BAKING INVOLVED!!!) and really simple but the end result is delicious!! The recipe is from one of my fave blogs to follow.. Happy Home Baking :) you can find the recipe HERE or my edited version below ^^

STRAWBERRY JELLY CHEESECAKE

Ingredients:

Base:110g Marie biscuits(about 8 pieces), chopped into fine crumbs
40g melted butter

Filling:
250g cream cheese, soften at room temperature
50g icing sugar
1 tablespoon gelatin powder
40ml boiling water
1 teaspoon vanilla essence

1 box Jelly crystal (strawberry flavour)
1 cup boiling water
1 cup cold water

Some strawberries and a cherry for the top

1. Mix biscuit crumbs & melted butter together and press firmly with the help of a spoon onto the base of a 18cm springform tin. Chill for 30 minutes.

2. Slowly pour gelatin into a bowl of boiling water, constantly stirring until all gelatin is dissolved.

3. With an electric mixer, beat cream cheese , icing sugar and vanilla essence until smooth & creamy. Blend in gelatin solution and mix well.

4. Pour the cheese mixture into the cake tin. Layer the strawberries on the cheese mixture. Chill for at least 3 to 4 hours.

5. Dissolve the jelly crystal in the cup of boiling water, followed by the cold water. Pour the jelly on the cheese mixture. Let it set before removing from the cake tin.


blow the candles out~~

slice up~~


say.. "CHEESECAKE"!!!!!!!!!!!!!

Sunday, November 20, 2011

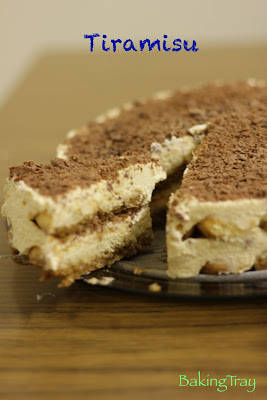
Tiramisuuu-can-do-it-tooooo!!

Finally!!! I made my first TIRAMISU! =D I've been wanting to make it for ages but I guess I was too lazy to buy all the ingredients. BUT... my friend was going back to Malaysia for a holiday and she had just bought some marscapone cream that would go to waste....so she gave it to me :) (THANK YOU!!<3).


All I needed to get were the sponge finger biscuits and i was ready to goooo!! 


The recipe I used was originally for Tiramisu Charlotte cake from Happy Home Baker, however I did not have enough sponge finger biscuits to decorate the outside :( and didn't have any Marsala ... so this is an ALCOHOL FREE version :P 
but it still tasted GREAT!!!!


The cream should have covered all the biscuits >< oops!
This is the second easiest cake you can MAKE! (the first being Chocolate ripple cake =p) because its all about layering and no baking required ^^v


Ingredients:


Espresso Syrup:
1 tablespoon instant coffee powder
1/2 tablespoon sugar
1/2 cup (125ml) boiling water
Filling:
250g mascarpone cheese
1 1/2 teaspoons vanilla extract
3 tablespoons icing sugar
1 cup (250 ml) heavy/whipping cream

about 24 sponge fingers (savoiardi)
50g grated dark chocolate
cocoa powder, to dust

1. Make the espresso syrup by dissolving instant coffee powder and sugar in boiling water. Leave to cool.


2. Make the filling by whisking marscapone cheese with icing sugar, vanilla extract and 3 tablespoons of espresso syrup until blended.


3. Whip cream using electric mixer until soft peaks form. Fold 1/4 of whipped cream to the marscapone mixture with a spatula, then fold in remaining whipped cream.


4. Gently dip (not soak) sponge fingers in the espresso syrup and use to line the base of a 7" spring form round tin. Cut the sponge fingers into shorter pieces if necessary.


5. Spoon over half of the filling and spread evenly. Sprinkle graded chocolate over the filling. Repeat with another layer of sponge fingers and spoon over remaining filling. Spread and smooth the top and sift cocoa powder and grated chocolate on the top.


6. Cover with cling wrap and refrigerate for at least 4 hours - BEST left overnight! the sponge fingers soak up the flavour better :)


You can also decorate with fresh strawberries and other chocolate goodies!!


SLICE FOR ME :)

Tuesday, November 8, 2011

A apple (cake??) a day keeps the doctor away :)

Who doesn't love apples? I have one almost everyday! And i love to use them in cakes as well =) This recipe for Apple spice cake had been in my "to-bake-list" for a while. I had been looking up apple cake recipes after a colleague at work bought one from her local bakery for another collegue's birthday. It was really sweet and moist and tasted just like a grandma's apple cake!! 

I baked this cake one weekend when I was in my "cake baking" moods. Actually no... it wasn't even a weekend but a weekend XD made it for the next day's lab meeting at work! Everyone seemed to enjoy it ^^ and even asked for the recipe! So here it is!!

APPLE SPICE CAKE
Ingredients
  • 1 1/3 cups vegetable oil (I only used 1 cup and it seemed to be ok.. even though my mum said it was a little dry =_=)
  • 3 cups plain flour
  • 1 tbsp cinnamon
  • 1 tsp baking soda
  • 1 tsp salt
  • 2 cups sugar (I used 1 cup brown sugar + 1 cup caster sugar)
  • 3 eggs
  • 2 large Granny Smith apples, cored and cup into 1/2-inch pieces (3 cups)
  • 1 cup chopped assorted nuts (I FORGOT TO ADD THIS T_T)
  • 1 tsp vanilla extract (I forgot this as well T_T)
Method
  1. Preheat oven to 180oC. Spray a 12-cup Bundt pan with cooking spray and set aside.
  2. Sift together flour, cinnamon, baking soda and salt in a large bowl.
  3. Combine vegetable oil, sugar and eggs in bowl and beat with electric mix on high speed for 3-4 minutes until well incorporated.
  4. Gradually add the dry ingredients into the bowl while beating.
  5. Add apples, nuts and vanilla and mix with wooden spoon until incorporated.
  6. Pour batter into prepared pan and bake until skewer inserted in the center comes out clean (~60-75 minutes).
  7. Invert cake onto rack and allow cake to cool before serving.
Using my new cake stand ^^ hehe...
They suggest to serve the cake with caramel sauce but I think I like it as it is. Enjoy this delicious cake ~~ mmm.. APPLES =D

Sunday, November 6, 2011

Scroll up.. scroll up!!

I've been really into making bread recently!! Ever since I came across this "no knead" bread roll recipe - magical rolls by Happy Home Baking !! I found that bread isn't that hard at all!

With all new recipes I come across, I stick to the recipe the first time i try it! then .. the second time I play around with it.. making changes!=) thats the fun of baking right?

So first I made the DELICIOUS cinnamon rolls =D I was so happy with how they turned out! soft in the centre~ sweet, cinnamony filling! BUT.. because I used margarine, not unsalted butter, it was a little too salty for my liking. So I changed the recipe a little bit to make SAVOURY ROLLS =D They were just as YUM! With the basic bread recipe you can put any filling you like! so HAVE A GO and BE CREATIVE =)

Cinnamon scrolls (adapted from HHB)

Ingredients:
(makes 12 ~ 15 rolls)

Dough:
250ml (1 cup) milk
50g (1/4 cup) brown sugar
1/4 cup vegetable oil
1 packet dry yeast
250g (2 cups) + 30g (1/4 cup) plain flour
1/4 teaspoon baking powder
1/4 teaspoon (scant) baking soda
3/4 teaspoon salt

for filling:
1 tablespoon ground cinnamon (cinnamon powder)
50g (1/4 cup) sugar (I used brown sugar)
50g (1/4 cup) unsalted butter (melted)

Method:
  1. Mix milk, sugar and vegetable oil in a small pot. Heat mixture until just before boiling. Leave for ~45min - 1 hour to cool.
  2. Place 2 cups plain flour and yeast in a mixing bowl. Make a well in the centre and add the above mixture. Mix until the mixture comes together to form a thick batter. Cover with a clean towel and let batter sit for at least 1 hour.
  3. Add in the remaining flour, baking powder, baking soda an salt. Stir until the mixture comes together. - You can makes the rolls now or cver and leave to chill in the fridge overnight or until needed. If left to chill, check the dough and punch it down by folding with a spatural if hte dough rises almost to the rim of the mixing bowl.
  4. When ready to make the rolls, mix ground cinnamon and sugar in small bowl.
  5. Dust work surface with flour. Dust the top and bottom of dough with flour. Roll out dough into rectangular shape as thin as possible. Dust the dough and work surface with flour when needed.
  6. Brush rolled dough with melted butter and sprinkle cinnamon and sugar mixture evenly.
  7. Starting from the opposite end of the dough, roll the dough neatly in a line towards you as tight as posible. Pinch the seams to seal.
  8. Cut into 1 incch thick slices and arrange on baking pan lined with baking paper. Place rolls close to together so that they are almost touching.
  9. Cover with a clean towl and leave to rise for 30 minutes or until rolls double in size.
  10. Bake in preheated oven at 180oC for 20 minute or until golden brown.
These are best eaten FRESH from the oven!! and they probably won't last that long either =p

Other savoury fillings include:
Meat floss + chives
Ham + chives

Trio of scrolls - (from left to right) Cinnamon, Ham and chives, meat floss and chives

Had to quickly take a photo before it was GONE =p

Tuesday, November 1, 2011

Birthday baking blessings :)

Hi ALL!! Apologies for not blogging for a while!!! I've been meaning to but just never got round to doing it ><" There's quite a few things that I have been baking.. many are just repeats of old recipes but there are some new recipes that I will post soon!
ready to bakeeeee =D
I'm an OCTOBER BABY so had my birthday last week. It was a really fun day! lots of surprises, cake and presents! so thank you all for making the day so special =)

I have received a lot of baking equipment/related presents over the year - kenwood mixer, sunbeam handheld mixer and electronic scale. But i also received more!! =D I think I am now ready to conquer the baking world ^____^ Here's just a photo snapshot of my baking birthday ^^

Mango and tea swiss roll bday cake at home ^__^
My own cooking book!!! =D
GIANT CHOCOLATE FRECKLE! dont' worry! i didn't eat it all~ shared it round!
Strawberry and apple crumble cake baked by my friend!!!! :) IT WAS DELICIOUS! i might have to steal this recipe and give it a go!
ZUMBO COOKBOOK! YAY!!! As soon as I saw this book in the shops I wanted it! its so awesome! he's so creative~
In that box is a cake stand =D
"The recipe for happiness is many cakes" - i like this quote :)
MACARON card and oven glove :) - special from London ^^
AWESOME APRON!! i'm going to try and make all those flavours so I can wear around my menu =p
and just had to put this photo in.. FAMOUS APPLE STRUDEL from CORICA - northbridge, Perth! must try !!

 So I have everything I need to start BAKING!!! :)