Monday, December 19, 2011

Semi-fail bakes

2011 is coming to an end... so I thought to post a few of my "semi-fail" bakes. Yes.. BakingTray does fail!! I think it is all part of the learning process and all part of baking! You learn from the mistakes you make and you improve the recipe by changing it here and there. I haven't had time to improve these 2 recipes but I can give you the original if you want to try and improve =D

1) Peanut butter cookies (adapted from Bluebakeblog's Nutella cookies)

Ingredients
1 egg
2 tbs peanut butter

1 cup of self raising flour (a little less than 1 cup actually)~
2 tbs cornstarch
1/2 tsp salt


  1. Preheat the oven to 180oC
  2. Beat egg and peanut butter together until a nice consistency.
  3. Sift the self raising flour with cornflour mixture into the egg and peanut butter mixture and mix, add the salt too and further mix.
  4. Roll into 24 evenly divided ball shapes. Then place them on a baking tray lined with baking paper and press them gently, to make them a little flatter so that they'll stay.
  5. Bake for 8-10 minutes. 
  6. Top cookies with chocolate ganache and a roasted peanut.
Problems: When rolling the cookies up they kept falling apart because they were too dry. The flavour was quite intense....

Improvements: These cookies were quite dry so maybe by adding more peanut butter or another egg would improve texture. OR.. just stick to nutella =p


It's hard to make these look pretty ><"

2) Mango cheesecake (adapted from Woolworths FRESH magazine, Issue 70, December 2011: Mixed Berry Cheesecake)


Ingredients
125g Milk Arrowroot biscuits (i used Marie biscuits), broken
75g butter, melted
2 eggs
1 tbs caster sugar
1  tsp cornflour
2/3 cup milk
1 1/2 tbs boiling water
1 tbs gelatine
250g cream cheese
2/3 cup sour cream (i used thickened cream)
1/3 cup caster sugar, extra
1 mango diced (original recipe was for mixed berry cheesecake so they used 1 punnet each strawberries, blurberries and raspberries)
1/4 cup raspberry jam 

  1. Line base and sides of 20cm springform cake tin with baking paper.
  2. Process biscuits in food processor until finely crushed. Add butter and process until well combined. Press firmly over base of tin and refrigerate.
  3. Separate eggs and set whites aside. Beat egg yolks with caster sugar and cornflour until thick and pale.
  4. Heat milk in small saucepan until almost boiling. Gradually whisk into egg mixture. Return mixture to pan and stir over medium heat until custard thickens. Remove from heat, cover and cool.
  5. Place boiling water into a jug and sprinkle over gelatine. Stir until gelatine dissolves and stir into custard.
  6. Beat cream cheese, sour cream and extra caster sugar until smooth. Fold custard mixture into cream cheese mixture.
  7. Beat egg whites until stiff peaks form and fold lightly into mixture.
  8. Stir through diced mango and spoon mixture over base. Refrigerate overnight.
  9. Heat jam for 30 sec in microwave. Press through sieve to remove seeds. Spoon over the top of cheesecake and chill for 10 minutes.
Problems: After overnight refrigeration the cheesecake was SUPER soft! Also wasn't as sweet as I would like.

Improvements: I substituted sour cream with thickened cream but maybe I should have stuck to the original. I had to out the cheesecake into the freezer because it was too soft.. so when it came out it tasted like icecream :D or parfait! ^^"

I guess it kind of looks nice =p haha a bit icey though..

So those are a few of the semi-fail recipes I have tried! I hope you will all try these recipes and be more successful than me :) then share with me your tips and secrets so I can succeed too! hehe... till next year~~ KEEP UP THE BAKING =D

- BakingTray

Thursday, December 15, 2011

Going BANANAS~~

I'm so happy because the price of bananas has FINALLY gone down! Now less than 2 dollars =D That means ...... more BANANAS! our fruitbowl is now whole again =) My craving of bananas was finally satisfied. This also means that all the banana recipes that I had kept could be used =D
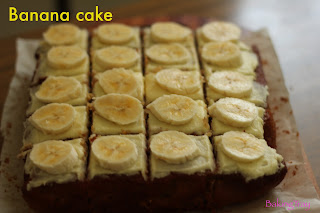
So first up is BANANA cake! First time I have used this recipe. It's quite moist and dense but full of banana flavour!.. and don't forget! really simple~ 
Adapted from Exclusively Food.


Ingredients
125g butter, softened 
330g (1 1/2 cups) sugar - I used brown sugar
280g (1 very slightly rounded cup) very ripe, mashed banana - around 2 bananas
1 teaspoon natural vanilla essence
2 large eggs 
100ml milk
225g (1 1/2 cups) self-raising flour
1/2 teaspoon bicarbonate of soda


1. Preheat oven to 160oC. Grease cake tin and line with baking paper.
2.Place butter, sugar, banana, vanilla and eggs in a food processor (or large bowl and beat with electric mixer). Process for ~2 minutes. Add milk and pulse to combine.
3. Add sifted flour and bicarb soda and mix until combined.
4. Pour batter into cake tin and bake for around 50-60 minutes or until skewer inserted in the centre comes out clean.
5. Leave cake to cool on a wire rack. Once cool, spread cream cheese frosting and decorate with banana pieces.


So what are you waiting for?? GO BANANASSSS~~~ @_@ :D

Sunday, November 27, 2011

What's red and velvety?

I just made it in time for my entry for "Aspiring Bakers #13!!!* hosted by Min of Min's blogThe theme for November is "Enjoy cupcakes" so I decided to bake RED VELVET CUPCAKES!! This is the first time I have made them and they didn't turn out as "red" as I would have liked them.... but hopefully they are still "velvety" ^_^"

I also finally made cream cheese frosting (i remember I had a craving for it a while ago..) but as I don't own a piping bag the frosting looks a bit weird =S I got this recipe from The Cake Mistress' blog who adapted the recipe from the Hummingbird Bakery Cookbook.


Ingredients

60g unsalted butter, room temperature
150g caster sugar
1 egg, lightly beaten
10g cocoa powder
20 ml red food colouring (I used 20ml water with red colouring powder added)
1/2 tsp vanilla essence
120ml buttermilk (I replaced this with normal milk)
150g plain flour
1/2 tsp salt
1/2 tsp bicarb soda\
1 1/2 tsp white wine vinegar (I used normal white vinegar)

Cream Cheese Frosting

300g icing sugar
50g unsalted butter, room temperature
125g cream cheese, slightly softened

1. Preheat oven to 170oC. Line 12-hold cupcake tin with patty cases.
2. Beat butter and sugar with electric mixer until light and fluffy. Gradually add egg and beat until well combined.
3. In a small bowl, mix food colouring, cocoa powder and vanilla extract until thick paste consistency.
4. Add paste to the butter mixture and beat thoroughly until colour is mixed evenly through the batter. The mix should be a deep rose pink/red.
5. Slowly add half the buttermilk until well mixed then add half the flour until well mixed. Repeat for the remaining milk and flour, beating until the mixture is smooth.
6. Add salt, bicarb soda and vinegar and beat for a couple more minutes.
7. Spoon into each cupcake hole about 2/3 full.
8. Bake for 20-25 minutes or until skewer inserted comes out clean.
9. Remove cupcakes from tin and allow to cool completely on wire rack. Meanwhile prepare cream cheese frosting.
10. In a food processor or electric mixer, beat the icing sugar and butter until well mixed.
11. Dice the cream cheese into smaller cubes and add to the mix, beating until completely combined. Continue beating until frosting becomes light and fluffy (~5 minutes)
12. When cupcakes are cooled, pipe the cream cheese frosting on top.

cupcakes for u :)
Happy with this photo =) for my future cookbook XD hahaha

Tuesday, November 22, 2011

say... CHEESE-cake!

It was recently my younger sister's birthday and we were having a little *surprise* gathering for her so I decided to make the birthday cake!! It was also good timing because I had just bought cream cheese!!! which means... CHEESECAKE!! My sister just thought I was making it for fun... but little did she know it was for her birthday!

Happy 21st~~
The last time I attempted to make a cheesecake was YEARS ago back when I was in.. high school? we went over to a friends house to bake it~ back then i wasn't really into baking that much and the cheesecake turned out... alright.. a bit too dense and not so sweet. So this is the FIRST cheesecake I have made since BakingTray began =p

This is a frozen cheesecake (NO BAKING INVOLVED!!!) and really simple but the end result is delicious!! The recipe is from one of my fave blogs to follow.. Happy Home Baking :) you can find the recipe HERE or my edited version below ^^

STRAWBERRY JELLY CHEESECAKE

Ingredients:

Base:110g Marie biscuits(about 8 pieces), chopped into fine crumbs
40g melted butter

Filling:
250g cream cheese, soften at room temperature
50g icing sugar
1 tablespoon gelatin powder
40ml boiling water
1 teaspoon vanilla essence

1 box Jelly crystal (strawberry flavour)
1 cup boiling water
1 cup cold water

Some strawberries and a cherry for the top

1. Mix biscuit crumbs & melted butter together and press firmly with the help of a spoon onto the base of a 18cm springform tin. Chill for 30 minutes.

2. Slowly pour gelatin into a bowl of boiling water, constantly stirring until all gelatin is dissolved.

3. With an electric mixer, beat cream cheese , icing sugar and vanilla essence until smooth & creamy. Blend in gelatin solution and mix well.

4. Pour the cheese mixture into the cake tin. Layer the strawberries on the cheese mixture. Chill for at least 3 to 4 hours.

5. Dissolve the jelly crystal in the cup of boiling water, followed by the cold water. Pour the jelly on the cheese mixture. Let it set before removing from the cake tin.


blow the candles out~~

slice up~~


say.. "CHEESECAKE"!!!!!!!!!!!!!

Sunday, November 20, 2011

Tiramisuuu-can-do-it-tooooo!!

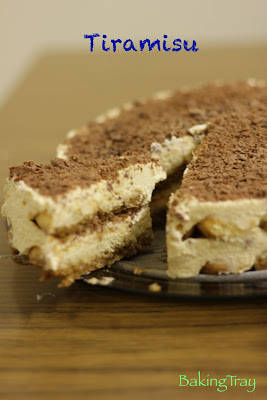
Finally!!! I made my first TIRAMISU! =D I've been wanting to make it for ages but I guess I was too lazy to buy all the ingredients. BUT... my friend was going back to Malaysia for a holiday and she had just bought some marscapone cream that would go to waste....so she gave it to me :) (THANK YOU!!<3).


All I needed to get were the sponge finger biscuits and i was ready to goooo!! 


The recipe I used was originally for Tiramisu Charlotte cake from Happy Home Baker, however I did not have enough sponge finger biscuits to decorate the outside :( and didn't have any Marsala ... so this is an ALCOHOL FREE version :P 
but it still tasted GREAT!!!!


The cream should have covered all the biscuits >< oops!
This is the second easiest cake you can MAKE! (the first being Chocolate ripple cake =p) because its all about layering and no baking required ^^v


Ingredients:


Espresso Syrup:
1 tablespoon instant coffee powder
1/2 tablespoon sugar
1/2 cup (125ml) boiling water
Filling:
250g mascarpone cheese
1 1/2 teaspoons vanilla extract
3 tablespoons icing sugar
1 cup (250 ml) heavy/whipping cream

about 24 sponge fingers (savoiardi)
50g grated dark chocolate
cocoa powder, to dust

1. Make the espresso syrup by dissolving instant coffee powder and sugar in boiling water. Leave to cool.


2. Make the filling by whisking marscapone cheese with icing sugar, vanilla extract and 3 tablespoons of espresso syrup until blended.


3. Whip cream using electric mixer until soft peaks form. Fold 1/4 of whipped cream to the marscapone mixture with a spatula, then fold in remaining whipped cream.


4. Gently dip (not soak) sponge fingers in the espresso syrup and use to line the base of a 7" spring form round tin. Cut the sponge fingers into shorter pieces if necessary.


5. Spoon over half of the filling and spread evenly. Sprinkle graded chocolate over the filling. Repeat with another layer of sponge fingers and spoon over remaining filling. Spread and smooth the top and sift cocoa powder and grated chocolate on the top.


6. Cover with cling wrap and refrigerate for at least 4 hours - BEST left overnight! the sponge fingers soak up the flavour better :)


You can also decorate with fresh strawberries and other chocolate goodies!!


SLICE FOR ME :)

Tuesday, November 8, 2011

A apple (cake??) a day keeps the doctor away :)

Who doesn't love apples? I have one almost everyday! And i love to use them in cakes as well =) This recipe for Apple spice cake had been in my "to-bake-list" for a while. I had been looking up apple cake recipes after a colleague at work bought one from her local bakery for another collegue's birthday. It was really sweet and moist and tasted just like a grandma's apple cake!! 

I baked this cake one weekend when I was in my "cake baking" moods. Actually no... it wasn't even a weekend but a weekend XD made it for the next day's lab meeting at work! Everyone seemed to enjoy it ^^ and even asked for the recipe! So here it is!!

APPLE SPICE CAKE
Ingredients
  • 1 1/3 cups vegetable oil (I only used 1 cup and it seemed to be ok.. even though my mum said it was a little dry =_=)
  • 3 cups plain flour
  • 1 tbsp cinnamon
  • 1 tsp baking soda
  • 1 tsp salt
  • 2 cups sugar (I used 1 cup brown sugar + 1 cup caster sugar)
  • 3 eggs
  • 2 large Granny Smith apples, cored and cup into 1/2-inch pieces (3 cups)
  • 1 cup chopped assorted nuts (I FORGOT TO ADD THIS T_T)
  • 1 tsp vanilla extract (I forgot this as well T_T)
Method
  1. Preheat oven to 180oC. Spray a 12-cup Bundt pan with cooking spray and set aside.
  2. Sift together flour, cinnamon, baking soda and salt in a large bowl.
  3. Combine vegetable oil, sugar and eggs in bowl and beat with electric mix on high speed for 3-4 minutes until well incorporated.
  4. Gradually add the dry ingredients into the bowl while beating.
  5. Add apples, nuts and vanilla and mix with wooden spoon until incorporated.
  6. Pour batter into prepared pan and bake until skewer inserted in the center comes out clean (~60-75 minutes).
  7. Invert cake onto rack and allow cake to cool before serving.
Using my new cake stand ^^ hehe...
They suggest to serve the cake with caramel sauce but I think I like it as it is. Enjoy this delicious cake ~~ mmm.. APPLES =D

Sunday, November 6, 2011

Scroll up.. scroll up!!

I've been really into making bread recently!! Ever since I came across this "no knead" bread roll recipe - magical rolls by Happy Home Baking !! I found that bread isn't that hard at all!

With all new recipes I come across, I stick to the recipe the first time i try it! then .. the second time I play around with it.. making changes!=) thats the fun of baking right?

So first I made the DELICIOUS cinnamon rolls =D I was so happy with how they turned out! soft in the centre~ sweet, cinnamony filling! BUT.. because I used margarine, not unsalted butter, it was a little too salty for my liking. So I changed the recipe a little bit to make SAVOURY ROLLS =D They were just as YUM! With the basic bread recipe you can put any filling you like! so HAVE A GO and BE CREATIVE =)

Cinnamon scrolls (adapted from HHB)

Ingredients:
(makes 12 ~ 15 rolls)

Dough:
250ml (1 cup) milk
50g (1/4 cup) brown sugar
1/4 cup vegetable oil
1 packet dry yeast
250g (2 cups) + 30g (1/4 cup) plain flour
1/4 teaspoon baking powder
1/4 teaspoon (scant) baking soda
3/4 teaspoon salt

for filling:
1 tablespoon ground cinnamon (cinnamon powder)
50g (1/4 cup) sugar (I used brown sugar)
50g (1/4 cup) unsalted butter (melted)

Method:
  1. Mix milk, sugar and vegetable oil in a small pot. Heat mixture until just before boiling. Leave for ~45min - 1 hour to cool.
  2. Place 2 cups plain flour and yeast in a mixing bowl. Make a well in the centre and add the above mixture. Mix until the mixture comes together to form a thick batter. Cover with a clean towel and let batter sit for at least 1 hour.
  3. Add in the remaining flour, baking powder, baking soda an salt. Stir until the mixture comes together. - You can makes the rolls now or cver and leave to chill in the fridge overnight or until needed. If left to chill, check the dough and punch it down by folding with a spatural if hte dough rises almost to the rim of the mixing bowl.
  4. When ready to make the rolls, mix ground cinnamon and sugar in small bowl.
  5. Dust work surface with flour. Dust the top and bottom of dough with flour. Roll out dough into rectangular shape as thin as possible. Dust the dough and work surface with flour when needed.
  6. Brush rolled dough with melted butter and sprinkle cinnamon and sugar mixture evenly.
  7. Starting from the opposite end of the dough, roll the dough neatly in a line towards you as tight as posible. Pinch the seams to seal.
  8. Cut into 1 incch thick slices and arrange on baking pan lined with baking paper. Place rolls close to together so that they are almost touching.
  9. Cover with a clean towl and leave to rise for 30 minutes or until rolls double in size.
  10. Bake in preheated oven at 180oC for 20 minute or until golden brown.
These are best eaten FRESH from the oven!! and they probably won't last that long either =p

Other savoury fillings include:
Meat floss + chives
Ham + chives

Trio of scrolls - (from left to right) Cinnamon, Ham and chives, meat floss and chives

Had to quickly take a photo before it was GONE =p

Tuesday, November 1, 2011

Birthday baking blessings :)

Hi ALL!! Apologies for not blogging for a while!!! I've been meaning to but just never got round to doing it ><" There's quite a few things that I have been baking.. many are just repeats of old recipes but there are some new recipes that I will post soon!
ready to bakeeeee =D
I'm an OCTOBER BABY so had my birthday last week. It was a really fun day! lots of surprises, cake and presents! so thank you all for making the day so special =)

I have received a lot of baking equipment/related presents over the year - kenwood mixer, sunbeam handheld mixer and electronic scale. But i also received more!! =D I think I am now ready to conquer the baking world ^____^ Here's just a photo snapshot of my baking birthday ^^

Mango and tea swiss roll bday cake at home ^__^
My own cooking book!!! =D
GIANT CHOCOLATE FRECKLE! dont' worry! i didn't eat it all~ shared it round!
Strawberry and apple crumble cake baked by my friend!!!! :) IT WAS DELICIOUS! i might have to steal this recipe and give it a go!
ZUMBO COOKBOOK! YAY!!! As soon as I saw this book in the shops I wanted it! its so awesome! he's so creative~
In that box is a cake stand =D
"The recipe for happiness is many cakes" - i like this quote :)
MACARON card and oven glove :) - special from London ^^
AWESOME APRON!! i'm going to try and make all those flavours so I can wear around my menu =p
and just had to put this photo in.. FAMOUS APPLE STRUDEL from CORICA - northbridge, Perth! must try !!

 So I have everything I need to start BAKING!!! :)


Thursday, September 29, 2011

Victoria sponge cake with strawberry butter cream filling~

One day I whipped up a bowlful of Strawberry Buttercream because I wanted to have a different filling for my strawberry macarons... I made such a mess making it and in the end I didn't think it went very well with the macarons. So ... what to do with a LARGE BOWL of strawberry buttercream? Use it for a cake of course!!! haha! i looked up a random recipe for a Victorian sponge cake (which is usually filled with jam and cream) and made it! it was really simple and turned out really nice and spongey ^^ 


For the sponge: (from http://www.goodtoknow.co.uk/recipes/130363/victoria-sponge)


Ingredients
125g self-raising flour
125g butter, softened
125g caster sugar
2 medium eggs
2 tbs milk


  • 1. Cream butter and sugar together with electric beater till pale and fluffy. 
  • 2. Add the eggs one and a time, beating between each addition. Sift in the flour and add milk and mix together.
  • 3. Divide mix between 2 pre-lined 7 inch round cake tins and bake in pre-heated 180oC oven for 20-25 minutes. Allow to cool in tin and turn them out onto a wire rack.
  • Strawberry Buttercream
  • 3 egg yolks
    90g caster sugar
    2 tbs water
    125g softened, unsalted butter
    90g strawberry jam  

  • 1. Beat egg yolks on high speed with electric mixer for 10 minutes until pale and creamy.
  • 2. Place sugar and water in small saucepan and bring to boil. Simmer until syrup reaches 121oC. Slowly pour syrup into the creamed yolks while beating at medium speed. Beat on high for 10 minutes, until cool.
  • 3. Add softened butter bit by bit while mixing on medium speed. Beat on high for 2 minutes. Add strawberry jam and beat for 2 minutes.
Layer one~~
2nd layer with iced topping!

Thursday, September 15, 2011

Green tea Chiffon cake

After my failed green tea chiffon cake and my semi-sucessful orange chiffon cake, I really wanted to try again!! After the first two tries I had learnt some valuable lessons (from my mistakes). 1) The more eggs in the recipe, the more volume it will give the cake. 2) Remember to quickly invert the pan when taken out of the oven so the cake won't sink.
I'm not sure about you guys... but when I fail a recipe.. i get annoyed =___=" and then I need to bake something else that does work XD hahha.. but yeh!! Another thing is that it just makes me want to succeed the next time!! AND THIS TIME I DID! MUahhaha >:D so happy =) So I hope if you guys had failed before... try this recipe!!! quite fail proof i reckon =p

I got this recipe from Kirbie's Cravings!!

Ingredients
(A)
1 3/4 cup cake flour - I used plain flour and it worked out fine
1 tbsp baking powder
1 tsp salt
1/2 cup sugar
1 1/2 tbsp matcha powder (green tea powder) - i think next time I will add more because I couldn't really taste that much..

(B)
1/2 cup vegetable or canola oil
6 egg yolks
3/4 cup milk

(C)
6 egg whites
1/2 tsp cream of tartar
3/4 cup sugar

1. Preheat oven to 175oC.
2. Combine (A) ingredients in a bowl and stir well to blend.
3. Add (B) and beat with an electric mixer until smooth.
3. In a separate bowl, Beat egg whites and cream of tartar until moist peaks
formed. Gradually add 3/4 cup sugar, beating until stiff and shiny peaks are formed.
5. Fold 1/2 of the egg whites into the egg yolks mixture using a spatula. Stir and fold until no egg white streaks remain. Fold in remainder of egg whites.
6. Pour batter into ungreased 10" tube pan.
4. Bake for about 50- 55 mins or until a toothpick inserted in the center comes out clean. Invert cake pan and let cake cool completely in pan upside down. (I inverted my cake onto a bottle so the neck of the bottle was in the pan hole ^^) When cool, loosen the edges of pan cake to remove cake.


FAIL Green tea chiffon cake!! it sunk =(
Semi-successful orange chiffon cake.. just think it wasn't "chiffony" enough and too cakey xD recipe here
THIRD TIME SUCCESS (coz there is no such thing as luck =p)
On a side note... I got this for an early birthday present from my dad!!!

Our old one broke.. well had it for prob over 10 years.. SO YAY!! Guess I will be doing more baking =) =)

Wednesday, September 7, 2011

Puff... puff... puffys!!!

I was scrolling through a blog I'm following "Foodagraphy. By Chelle." and found this recipe for cookie topped choux puffs ~~
http://vintagetrinkets.blogspot.com/2010/11/cookie-topped-choux-puffs.html 
I got excited because the photos looked like PUFFYs from the shop =D So I thought I'd give it a go to see if it tasted like the real thing! hehe.. now you can give it a go too!

PUFFYS
Cookie dough (plain)
25g all purpose flour
25g unsalted butter
25g castor sugar
*For chocolate dough, use 20g all purpose flour and 5g cocoa powder

1. Place the unsalted butter in a bowl and use a spoon to mash till slightly softened.
2. Add in the sugar and mix to combine.
3. Add the flour (and cocoa powder if using) and use a spatula to mix till combined.
4. Wrap with cling wrap and roll into a mini cylinder. Place in the freezer to chill for at least half an hour.

Basic choux puffs recipe
30g all purpose flour
30g cake flour
40g unsalted butter
100ml water
5g castor sugar
pinch of salt
2 eggs (100g)

1. Preheat oven to 200°C.
2, Place water, butter, sugar, salt in saucepan.Heat the mixture till the butter melts and boils (at least 95°C).
3. Remove from heat, add the flour into the saucepan. Stir the mixture quickly to mix.
4. Place the saucepan back over medium heat. Stir constantly until dough forms and comes away from the sides and a thin layer of skin forms on the base of the saucepan, remove saucepan from heat.
5. Dump the dough into a mixing bowl, and while the dough is still warm, add in the eggs one at a time. Stir quickly to incorporate. 
6. Transfer the dough to a piping bag. Line a tray with baking paper. Snip off the end of the piping bag and start piping swirls of the dough onto the tray - or just spoon it on
7. Remove the cookie dough from the freezer, slice into pieces and place on top of the piped puffs. Press down slightly and ensure that the cookie rounds are in the center of the puffs (if not you'll end up with lopsided cookie tops!).
8. Place in preheated oven and bake for 30 minutes. Cool before filling with desired fillings.

Vanilla crème patisserie
1/2 vanilla pod
250ml milk
50g castor sugar
3 egg yolks
25g all purpose flour
20g unsalted butter

1. Scrape the vanilla pod and add to the milk in a saucepan.
2, Add the pod and half the sugar into the saucepan and heat till just boiling stage. Remove vanilla pod.
3. Whisk the egg yolks in a bowl, add in remaining sugar. Add in the flour and continue to whisk to combine.
4. Add the heated milk mixture to the egg yolks gradually. Whisk in a few tablespoons of the milk mixture into the yolks bit by bit, before adding the rest of the milk, whisking constantly.
5. Strain the mixture back into the saucepan and heat over low heat. Stir constantly using a wooden spatula to prevent the mixture from burning.
6. When the mixture has thickened considerably to a sticky thick consistency, remove from heat and stir in the butter.
7. Pour into a bowl and cool. When cooled, cover with cling wrap, ensuring that the cling wrap touches the top of the cream to prevent a skin from forming. Refrigerate till ready to use.
My puffys
Chelle's puffys

REAL puffys

Thursday, August 25, 2011

Devil's Food Cake

I've been meaning to blog about this recipe for a while! We had a random baking night at my cousins... and it was just after the Masterchef episode where they made Devil's food cake (with no recipe!!! well someone had to memorise the recipe... but yeah~) anyways so was always wondering what was so special about a Devil's food cake because it kind of looks like a chocolate cake~ I guess after making this I realise there are little surprises that make the taste different. This isn't Nigella's recipe ... but still just as good :)


Devil's Food cake


Ingredients
180g butter
1 3.4 cup caster sugar
3 eggs
1 1/2 cups self-raising flour
1/2 cup plain flour
1/2 tsp bicarb soda
2/3 cup cocoa powder
3 tsp dry instant coffee
1/2 cup milk
1/2 tsp red food dye
1/2 cup warm water


Rich chocolate frosting
60g dark chocolate
60g unsalted butter


1. Grease 2 20cm round cake tins and line with baking paper (we only had one...)
2. Beat butter and sugar till light and fluffy. Add eggs one at a time, beating well after each addition.
3. Fold in sifted flours, bicarb soda and cocoa powder with combined coffee, colouring, water and milk.
4. Pour mixture into prepared tins. Bake at 180oC for around 45 minutes (make sure you don't overcook it because it can go dry....)
5. Allow cake to cool and sandwich cakes with cream (or maybe jam?)
6. Make chocolate frosting by combining chocolate and butter in heatproof bowl over a pan of simmering water. Stir until smooth and ice cooled cake.


Had leftover cake mix so made Devil's food CUPCAKES! :D personally iced and decorated!


Recipe adapted from http://www.bestrecipes.com.au/recipe/Devils-Food-Cake-L2100.html

Monday, August 15, 2011

No bake cake!

You might be wondering, "Why blog about a no bake cake on a blog called Baking Tray??" haha!! Well just because I know there are people out there who say that they can't cook or bake.. but this is the EASIEST cake you can make!!! and the thing is, it looks amazing and tastes delicious!!! Whenever people see this cake they always ask me "how did you make it?? how do you get the layers??" so now.. i will tell you!!!
This recipe is on the biscuit packet and you may have also seen it on TV ads but here it is for you!

Chocolate Ripple Cake

Ingredients
1 packet Arnotts Chocolate ripple biscuits 
300ml thickened cream
1 tsp caster sugar
Milo or cocoa powder for dusting

1. Pour cream and sugar into a large bowl and whisk with electric mixer until stiff peaks form
2. Spread one biscuit with cream and layer another biscuit on top creating a sandwich. Continue spreading cream and adding biscuit until a log is formed - (this recipe creates 2 logs ~20cm long).
3. Lay log down onto plate and cover entire cake with cream. Dust with milo or cocoa powder and cover and place in fridge overnight.

Serving: Cut cake diagonally into slices!
 

Thursday, August 4, 2011

A little bread... A little butter

Who doesn't love a Bread and Butter Pudding. It's one of those CLASSIC recipes!! perfect for a winters night! or anytime in fact =D What I love about this recipe is that it's really simple and you can really put whatever you like! If you don't like raisins.. don't put them in! Add in chocolate.. fruit... chocolate =p

glistening ^____^
We made this for a BBQ at Joey's a few weeks ago! and it was a WINNER!! gone in a flash~~ 


Ingredients
  • 50g unsalted butter
  • 12 slices white bread (or any bread in fact! i think raisin bread would work really well!)
  • 50g sultanas (or CHOCOLATE - which is what we used because we forgot to buy sultanas)
  • 4 eggs plus 4 egg yolks
  • 175g caster sugar
  • 300ml thin cream
  • 300ml thickened cream
  • 1 tsp vanilla essence
  • 3 tbs apricot jam (or marmalade)
1. Lightly butter a 2-Litre baking dish. Remove crusts from bread and lightly butter each slice. Cut slice into 4 equal triangles and arrange in layers in dish. 
2. Sprinkle sultanas/chocolate (or BOTH!) between layers - be careful as sultanas and chocolate may burn if they are on the top layer. Layer crusts in a criss-cross pattern over the top (don't waste crusts!! hehe)
3. Whisk eggs, egg yolks and caster sugar together. Place both creams in a saucepan with vanilla essence and heat just before boiling (gentle heating). Pour cream over egg mixture and whisk lightly to combine.
4. Carefully pour over bread slices and set aside for 30 minutes - we didn't do this but the recipe says this will ensure a lighter pudding.
5. Place baking dish in roasting pan and pour enough boiling water into pan to come up halfway up the sides of baking dish.
6. Cover dish loosely with foil, bake in 180oC preheated oven for 15 minutes or until golden.
7. Heat apricot jam in microwave for ~30 seconds or in a small saucepan over low heat for 1-2 minutes till spreadable. Remove pudding from oven and brush over jam. 


Slice and EAT! :D best served warm with a scoop of vanilla icecream!!


Recipe adapted from http://www.taste.com.au/recipes/5131/bread+butter+pudding