Tuesday, November 26, 2013

Cronut Craze!!!!

CRONUT... Crossiant + Donut!
One of the best food inventions in the WORLD!!!! The texture is flaky and buttery but in the shape of a donut ^_^ So.... since this craze has taken over the world (ok.. maybe not the world but the foodie world at least =p) I decided to give it a go! I must thank SORTED FOOD! as I saw their clip on Youtube and it looked achievable! Check out their video below:

Cronuts
Recipe adapted from SORTED FOOD

Ingredients
60ml milk
65ml warm water
1 packet dried yeast (7g)
150g cold, diced butter
125g plain flour
125g strong flour
30g caster sugar
1/2 tsp salt
bowl of caster sugar
creme patissiere (recipe found here)
dark chocolate ganache (recipe found here)

1. Whisk milk, water and yeast together in a bowl.
2. Pulse cold butter and flours in food processor or rub between your fingers until it resembles breadcrumbs (but still has a few lumps of butter).
3. Stir the sugar and salt into flour mix and tip everything into the wet bowl.
4. Stir together and then using your hands, bring it into a dough. Cover loosely with clingwrap and leave it to rest for 2 hours.
5. Roll rested dough out on a floured surface to about 1cm thick, in a rectangle shape.
6. Fold the dough into thirds so that the last third overlaps the other two. Turn the dough 90 degrees and roll dough again into rectangle shape and repeat folding process twice more (I think if you wanted MORE layers, do this step a few more times).
7. Cover with clingwrap and leave in the fridge to rest for at least 4 hours or overnight.
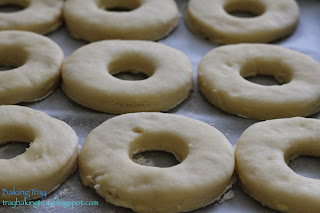
8. Roll dough out once more to about 1/2 cm thickness and use cutters to shape your donuts. Lay them on floured tray and cover with clean tea towel at room temperature to rise for another 1 hour.
9. Fry them in a few cm of oil to 170oC for 2 minutes on each side until puffed up and golden. Drain on paper towel briefly then toss them in caster sugar before leaving to cool.
You should have seen me when I was frying them! Jumping for joy because the puffed up :D
sugar coated!
10. Inject crème patissiere into the cronuts at 4 or 5 points around the ring using a piping bag with small nozzle or syringe.
With squirts of crème patissiere
11. Drizzle chocolate ganache on top and decorate as you wish!
These weren't as puffed up as the original but I think that's due to the folding of layers. They were still deliciously sweet and buttery =D Definitely on my "to-do-again" list (if such list exists).. but yeah! Basically, don't be scared!! you can do it :D :D :D!


Sunday, November 24, 2013

Work Catering #36: Last of 2013 - Tim tam Cheesecake!

So this is the last of my "Work Catering" series for 2013! It's been a really fun year! Enjoyed baking and being creative/adventurous each week! (haha! sounds like I am saying a farewell speech or something =p). Hopefully I can continue next year though! Anyways Baking Tray will still be baking so don't worry!
Deleeecious cheesecake :D
To end off the year I stuck with what I loveee to bake (or NOT bake).. and that's CHEESECAKE :D This time I used Tim Tams! Because.. who DOESN'T love Tim Tams?? Classic Aussie chocolate biscuits! Too bad America doesn't have them! They are missing out!! (btw I am not sponsored by Tim Tams at all.. but.. not saying no either if they are reading this post XD)

This recipe was originally for a round cake (22cm) but I have modified it to be made as a slice.

Tim Tam Cheesecake
Recipe adapted from Butter Hearts Sugar

Ingredients

Chocolate base
250g plain chocolate biscuits (I used chocolate ripple biscuits0
120g butter, melted

Cheesecake filling
2 tsp powdered gelatine
2 tbs boiling water
375g cream cheese, softened at room temperature
1 tsp vanilla extract
1/2 cup caster sugar
300ml thickened cream
180g white chocolate, melted
300g Tim Tams (~ 1 1/2 packets), roughly chopped

1. Line baking slice pan (20x30cm) with foil.
2. Crush/process biscuits until fine crumbs. Add melted butter and process until combined. Press mixture evenly over the base of pan and refrigerate for about 30 minutes.
3. Make filling by beating cream cheese, vanilla and sugar with electric beaters until smooth. Beat in cream until combined.
5. In a small heatproof bowl, dissolve gelatine in boiling water. Add to cream cheese mixture along with melted white chocolate. Beat until combined.
6. Stir through chopped Tim Tams.
7. Spread into pan, smoothing over the top. Refrigerate for at lease 3 hours until set.

This cheesecake is REALLLLLLLLYYY good! it's probably up there with the White Chocolate and Raspberry Cheesecake and Apple Crumble Cheesecake! Or maybe I'm just biased towards cheesecake =p

Next up is another easy no bake slice with MILO! (Also not sponsored by Milo =p). I used to drink this everyday back when I was in primary school! Not so much anymore but this slice brought me back to those days. It's quite sticky and sweet but a lovely Milo topping crunch!

Milo Slice
Recipe adapted from Retro Mumma

Ingredients

Base
250g packet Marie biscuits
395g (1 can) condensed milk
100g butter
1 cup Milo

Topping
200g white chocolate
50g butter
4 tbs Milo

1. Line baking slice pan (20x30cm) with foil.
2. Crush/process biscuits until fine crumbs. 
3. Place butter and condensed milk into large saucepan. Stir over low heat until butter has melted and mixture has combined. 
4. Add crushed biscuits and Milo. Stir until well combined.
5. Spoon mixture into prepared pan and use the back of a metal spoon to even it out. Refrigerate for about 1 hour or until firm.
6. For the topping, place butter and chocolate in bowl over a double boiler. Mix until melted then pour evenly over slice. Sprinkle with Milo and refrigerate until set. 
yummy sticky and sweet Milo slice~
Could have improved the white chocolate middle layer...
So.. that's it!!! Enjoy bakinggggg!!! I'll be finally blogging about all the other things I've made for birthdays or other random events so see you then =)

Friday, November 15, 2013

Work Catering #36: White chocolate and raspberry cheesecake slice and cookies

I couldn't think of a creative title! haha! Nice to get back into some cheesecake =D I realised that Scotch finger biscuits taste really good for a cheesecake base =) maybe because they are so buttery.. hehe! I liked this cheesecake BUT.. the only problem was the topping :( it was supposed to be a marbled raspberry topping... but kinda ended up being a messy splodge =___= oh wells! still tasted yummy! hehe

White chocolate and raspberry cheesecake slice
Recipe adapted from Taste.com.au
Ingredients
250g packet Arnott's Scotch Finger biscuits
100g butter, melted
2 tbs boiling water
3 tsp powdered gelatine
375g cream cheese, at room temperature
1/4 cup (55g) caster sugar
300ml thickened cream
1 tsp vanilla essence
180g white chocolate, melted and cooled

Raspberry topping
1 tbs boiling water
1 tsp powdered gelatine
200g frozen raspberries, thawed

1. Line base of 20x30cm slice pan with foil or baking paper.
2. Process biscuits and butter in food processor until mixture resembles fine breadcrumbs. Use back of spoon to press biscuit mixture over base of pan. Refrigerate for 30 minutes.
3. Beat cream cheese and sugar in bowl until smooth. Add cream, vanilla essence and chocolate and beat until well combined.
4. Dissolve gelatine in boiling water in small bowl. Allow to cool for 5 minutes before adding to cream cheese mix. Pour cheesecake mixture into prepared pan and smooth the surface.
5. To make topping, blend/process raspberries until smooth. (I had to add a bit of water to get it to a smooth puree). Dissolve gelatine in small bowl in boiling water then mix into raspberry puree.
6. Spoon raspberry mixture over cheesecake. Use a skewer to create a swirled effect. Place in fridge for 3 hours or until set. Cut into small pieces to serve.
see? not very pretty..

Looks a bit artificially red here..
I also made these cookies also knows as "Crisps".. not sure why though! haha I would personally call them chocolate crackled cookies ^^ They were of a chewy texture and very simple to make!

Chocolate Lace Crisps
Recipe adapted from The Organised Housewife
Ingredients
100g dark chocolate melts
80g unsalted butter
1 cup caster sugar
1 egg
1 cup plain flour
2 tbs cocoa powder
1/4 tsp bicarb soda
1/4 cup pure icing sugar

1. Preheat oven to 160oC and line 2 baking trays with baking paper.
2. Place chocolate and butter in small saucepan and melt over low heat.
3. In a separate bowl, combine sugar, egg, flour, bicarb soda and cocoa.
4. Pour in chocolate mix and stir to combine. Cover and refrigerate for 15 minutes.
5. Roll teaspoonsful of dough into balls and roll in icing sugar. 
balls rolled in icing sugar

Place on baking trays (allowing room for them to spread) and bake for 15 minutes.
Baking in the oven. Allow room for spreading~

Nice and crackly!


with sprinkles of icing sugar =)

Thursday, November 7, 2013

Work Catering #35: Tim Tam Balls!!!!! and sticky date!

Yes that's right! First came the Oreo Cheesecake Balls... and now it's Tim Tam Balls!!! My friend showed me this recipe and my first thought was "Only 3 ingredients! Only 3 steps!" (so lazyyyy =_=") but so delicious!! Actually, don't know why I didn't think of it earlier. If you can use Oreos, there are thousands of other biscuits you can use! Just process them, mix them with cream cheese, roll them into balls and TA DA!!!

Anyways, decided to make them a little more fancy by coating them in white chocolate and giving them a sprinkle of MILO ^^

Tim Tam Balls
Recipe adapted from Favourite Food Recipes
Ingredients
1 packet Tim Tams (250g)
250g block cream cheese, softened at room temperature
300g cooking chocolate (milk, dark or white.. it's up to you!), melted

1. Crush/Process Tim Tams. Add cream cheese and mix together until combined.
2. Roll into balls (1 tsp of mix). Refrigerate for 10 minutes.
3. Coat with melted chocolate and refrigerate until set.


coated in smooth white choc~~and a sprinkle of MILO~
inside... Tim Tam deliciousness!!!
I've also been wanting to make sticky date pudding - it's also one of those classic bakes but it seemed to always go down the list because I get distracted with cheesecakes or.. Tim Tam balls!!! hahha! anyways had some sticky date pudding at work the other day and it was sooooo good! So good that it gave me the motivation to make it :D the butterscotch sauce is definitely worth making!!!

Sticky Date Pudding with Butterscotch Sauce
Recipe adapted from Citrus and Candy

Ingredients
250g pitted dates, chopped
1 tsp bicarbonate soda
1 1/2 cups (375ml) boiling water
160g unsalted butter, softened at room temperature
1 cup packed brown sugar
1 tsp vanilla essence
2 eggs
2 cups self raising flour

Butterscotch Sauce
1/2 cup brown sugar
150ml thickened cream
1/2 tsp vanilla essence
30g butter

1. Preheat oven to 180oC. Grease and line rectangle baking tin (20x30cm) with baking paper.
2. Place dates and bicarb soda in a bowl. Pour over boiling water and stand for 20 minutes.
3. In a separate bowl, cream the butter, sugar and vanilla together until light and fluffy. Add the eggs one at time, beating well after each addition.
4. Fold through the date mixture (including the water) and flour until well combined. (The mixture may look really wet and watery but it'll work!)
5. Spoon the mix into baking tin and bake for 30-35 minutes or until skewer comes out clean. Cool in tin for 5 minutes before cooling on wire rack.
6. Make the butterscotch sauce but combining all ingredients into a medium saucepan. Bring to a boil over medium heat, constantly stirring. When boiled, reduce heat to low an simmer for a few minutes until darkened and thickened.
7. To serve, prick warm cake all over with skewer and pour a third of the butterscotch sauce over the cake. Allow to soak through for 10 minutes. Cut into square pieces and spoon extra sauce to serve.
More like sticky date cake slab! haha
Lil sticky squares ^^
With a chopped date on top :D all for presentation~

Sunday, November 3, 2013

Salted Caramel Cupcakes

 
Another belated post! hehe~I had some leftover salted caramel from my salted caramel swiss roll bake so decided to use it in some cupcakes! I really like the recipe I have for plain cupcakes because it means I can add whatever flavour to it! I was trying to decorate them nicely... but failed -___-" ended up just spreading the icing and drizzling leftover salted caramel on top :)
Salted Caramel Cupcakes
Recipe modified from Vanilla cupcakes

Ingredients
125g butter, softened
3/4 cup caster sugar
2 tsp vanilla essence
2 eggs
1 1/2 cups self-raising flour
1/2 cup milk
1/2 cup caramel chocolate chips

Salted buttercream frosting
2 tbs butter, softened
1/2 cup icing sugar
2 tbs salted caramel + extra

1. Preheat oven to 190oC and line a 12 hole muffin pan with cupcake cases.
2. Cream butter, sugar and vanilla with electric mixer until pale.
3. Beat in eggs one and a time, beating well after each addition.
4. Sift over flour and mix until almost combined. Stir in milk.
5. Fold in caramel chocolate chips and spoon into muffin holes. Bake for 15 minutes or until skewer inserted into the centre comes out clean.Once cooked, removed from oven and allow to cool.
6. Meanwhile make frosting by placing all ingredients in small bowl. Beat using electric mixer until it all comes together to form frosting consistency. If you find it's too runny, add more icing sugar... if you find it too dry add more butter:)
7. Ice cooled cupcakes and drizzle with extra salted caramel.

The cupcakes were light and fluffy and the caramel chocolate chips really went well with the whole salted caramel theme :) Gave a few away to friends and they liked them too :D hmmm... I wonder what other flavours I can make ^^